Labels

Tuesday, March 6, 2012

Cleaning Out My Closet

And by “my,” I mean the boys’. Because I’d rather sort their tiny little clothes into sweet little baskets than risk my life in my own clothes mountain—I mean closet.

The before picture is pretty bad. It involves an explosion of baby clothes entering our house in a few short months while we didn’t have the storage space to accommodate them, and I was pregnant with twins. Then, it involves having infant twins from months 1-6 who require clothes faster than I could wash them so they rarely got put away. Then, it involves a move from apartment to house so the closet mess was then duck taped into cardboard boxes, which were opened only on a desperate as-needed basis (There has to be a clean shirt in here SOMEWHERE that isn’t too small, right?!)
 

Which brings us to now – and this picture – 8 months into the twins’ lives, with mountains of clothes that no longer fit them, another mountain of clothes they wear now, and another mountain of clothes they can grow into. You might think I have these clothes actually in the 3 small piles of which I speak, but it was more like they are all twisted together in the closet but my mommy brain has kind of separated them out in my head. But alas, the time has come to get this closet together in our new home and make it functional for years to come!

Here are my (probably lame) tips for Closet Cleaning 101. It is probably only useful for amateurs like me who have not had much experience with actually gutting an entire closet and expecting everything to go back in perfectly neat. But as I’ve stated previously, I blog what I want. Let’s go.


1. BASKETS/BINS.
Just get em. Lots of them. Even if you don’t have a plan for what will go in each one. There are several reasons to go overboard on baskets. For one, they're space savers! Baskets make space out of what would otherwise by empty or wasted space. And a simple closet shelf lets you keep stacking baskets where space would otherwise be wasted under your hanging clothes. Make sure to get basket with straight or straight-ish sides. Slanted sides will waste space because you won’t be able to fit as many baskets in a side-to-side row. Baskets can also be some cute and come in a variety of styles; have fun with it!


(See all the WASTED space here before I added valuable storage with baskets? Here, the closet is fairly clean but can't hold much!)
The problem with this closet from the beginning was the amount of wasted space. I had three
choices of places to put things: 1) a shelf that is too high to be practical for daily use 2) a single clothes bar that will essentially only be used for hanging clothes and 3) the floor. Guess where most stuff ended up? Huge, unorganized floor piles that spilled out when you opened the door! But it’s actually a decent sized closet, and there actually is enough space for everything. You just have to put that space to work!


2. CREATE A HOME FOR EVERYTHING.

       It makes clean up a snap when you know where everything goes. Isn’t there a saying like “a place for everything and everything in it’s place?” There ya go. I started by pulling EVERYTHING out of the closet, and only putting it back in when I found a permanent home (aka the assigned basket).

In the end, my baskets were used for:
-clothes to save for future babies
-special keepsake clothes/items
-socks
-shoes
-hats
-pants/shorts


-and two at the bottom for toys the boys can play with while they’re hanging out around my feet when I’m cleaning their closet J


Maybe try setting aside those baskets in the beginning to help you get started, as well as baskets from other needs you know will pop up, like a place for hair accessories if you’re the parent of a little girl.

3.  Have fun!!!

This is last but not least! In fact, it’s first in order of importance! While I was picking out bins for the boys’ closet Dan said something like, “Just pick some, no one will see it anyway; it’s just a closet.” I agreed at the time. But then I did a double-think. Nope, while the boys are still too young to dress themselves, I’LL be seeing a lot of that closet! Each morning to dress the boys, each afternoon to put away clean laundry, each evening to get jammies…. I want this closet to be worth seeing and using 3+ times a day! Then when the boys use it more, I want it to be worth it to them to use well and keep nice.  So I went with bright chevron baskets as my “element of fun”. But the possibilities are endless! Paint the inside of your closet a fun color, even add stripes or polka dots (I know, you’re thinking, “This woman is crazy!” No, it’s ‘just a closet,’ remember? HAVE FUN.) Add a funky chandelier if you have the space! I'm sure Pinterest could offer loads more ideas than me ;)


Even use space on the back of the door! Plenty of options for hooks and back-of-the-door organizers are out there, just decide your needs and get an organizer to match. I got 2 Command hooks for each door to hang next-day outfits, and added each of my boys' initials both for fun and to assign sides of the closet for when they're older to avoid fights ;)

And here's the end results!!!


Here's a run down of what each box is used for, top to bottom:
-Top clear zig zag boxes are keepsake/special clothes (like coming home outfits)
-Long clear box is too small clothes I want to keep for future babies. The rest I have set aside for charity.
-Two solid boxes are bags and spare hangers.
-Then, there's hanging clothes and laundry basket for dirty clothes.
-Middle zig zag boxes are for hats, pants/shorts, socks, and shoes.
-Bottom baskets are for spare blankets/linens.
-Bottom zig zag boxes are toys.

Now go tackle your closets! Have fun!

-Beth

Tuesday, February 28, 2012

Paper Covered Letters Tutorial

It's not even been a week since my last craft tutorial, but I feel it's been too long! So here's another recent craft I did, as well as how I did it!

We've all seen the paper or fabric covered letters before, especially in kid's rooms, and I wanted to get some for Eli and Asher. I wanted to take the easy way out and grab them off of Etsy, but I wasn't seeing what I wanted so I took a trip to Hobby Lobby, picked my own supplies, and in the end I got just what I wanted!

1. To start, you'll need these supplies: kraft letters from Hobby Lobby, scrapbook paper of choice, mod podge, brush, ribbon (sides are 1" but i used 7/8" ribbon and it's fine), and hot glue. (For my letters, I found a weird product in the paper section at hobby lobby that's like a soft paper, so it's almost like thick fabric. That's how I got the stitch detail in mine; the "paper" came like that).


2. Use your brush to put a nice coat of mod podge on the top and sides of your letter. Press your entire sheet of paper flat on top of your letter.
 3. Turn your letter over, trim excess paper, and cut slits and notches where the paper will need to fold over the edges of your letter.
 4. Fold edges up, press, and hold for a few seconds to help them stay in place.
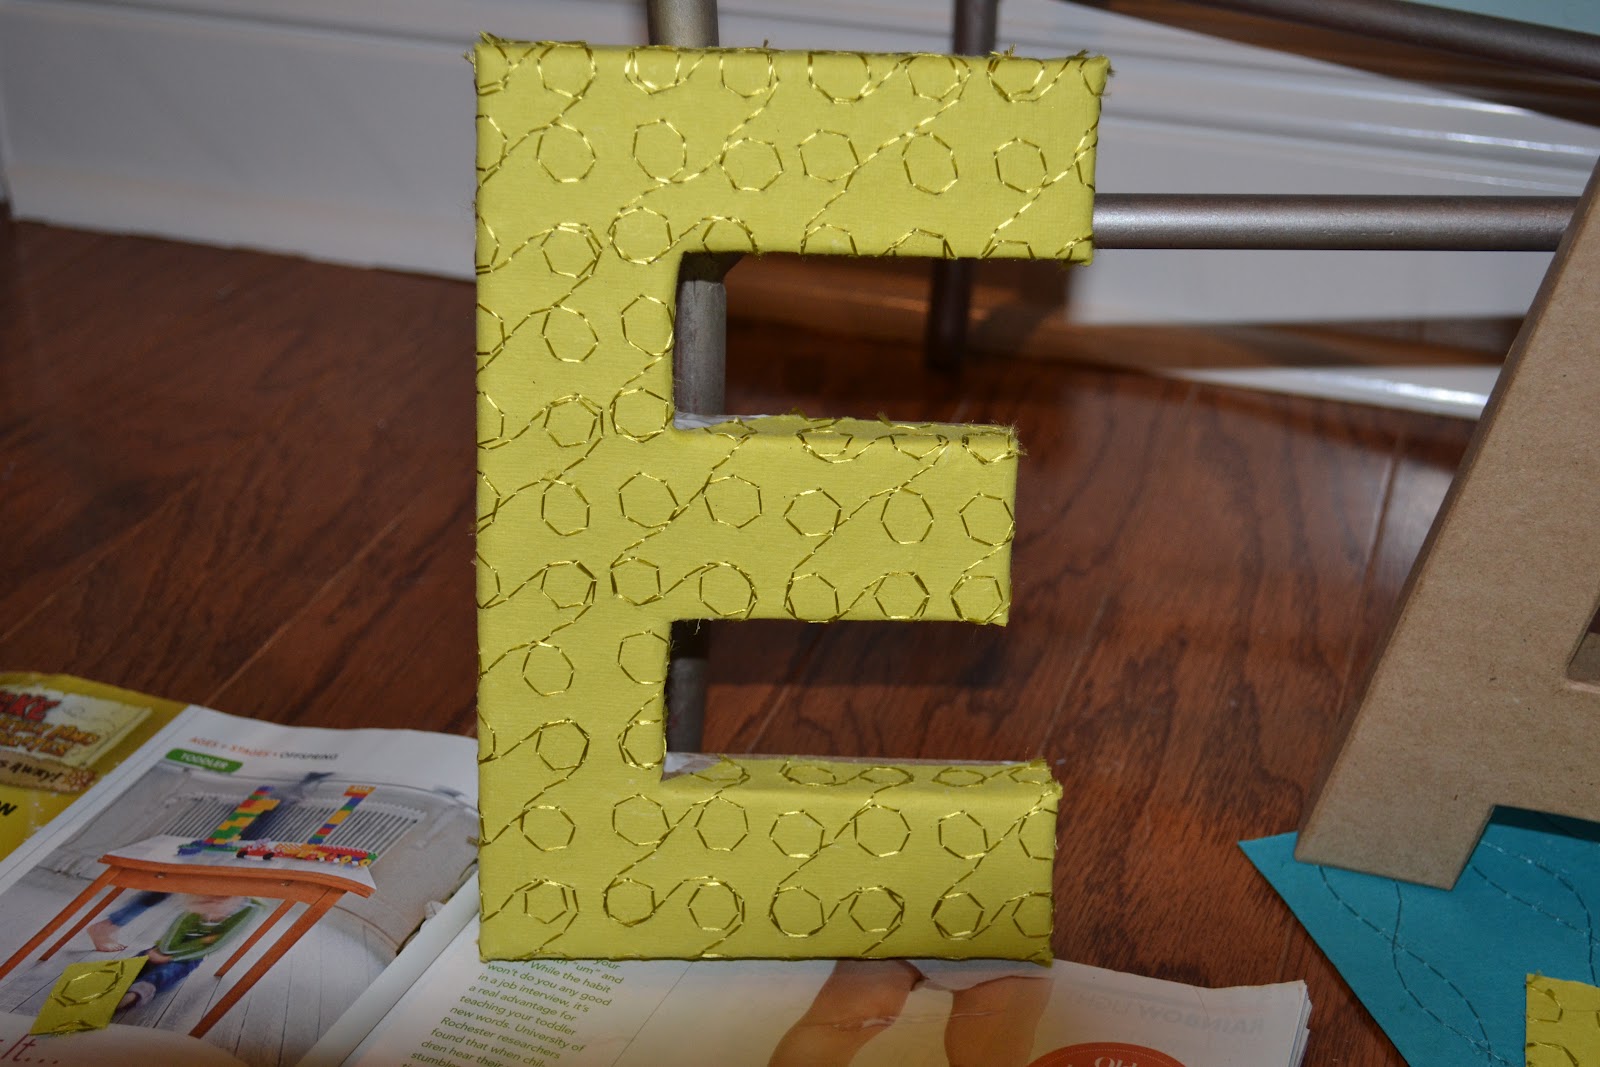
 5. Pretty soon your letter will look like this!
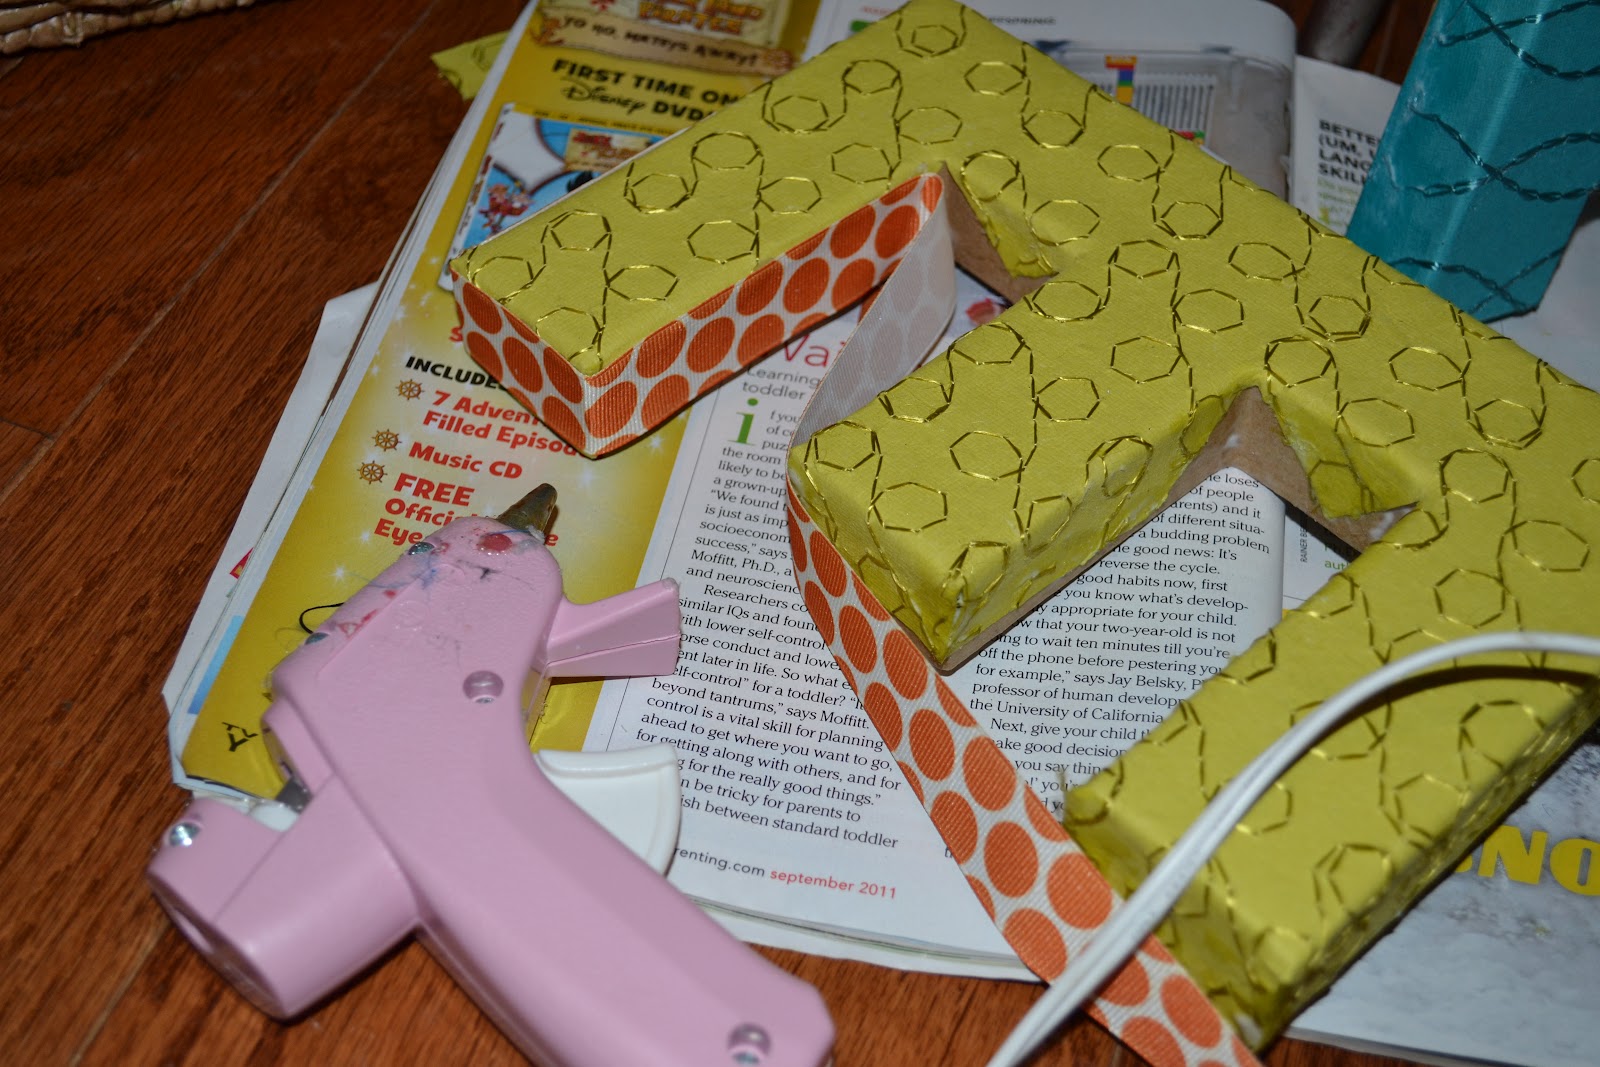
 6. For a more finished edge and a little more fun, add ribbon to the sides of your letter using hot glue. 1 inch ribbon may work best for these particular letters, but I couldn't find any and used 7/8." You can see a bit of the brown near the back of the letter where it doesn't completely cover, but you have to be really looking hard, and it's not a big deal :)
 7. Done!! Check em out!!

Like what you see? I'll gladly take custom orders for cute letter(s) for your kids' rooms or any room in your house! (I have letters that spell "love" in my kitchen!) Just e-mail me at bhiggi5@tigers.lsu.edu. $10/letter.

-BETH

Ps. These letters are for the boys' closet, which is a whole 'nother project in itself! Watch for that blog post soon :)

Monday, February 27, 2012

Crib to 10k

Most of us have heard of the "Couch to 5k" workout plan by now, right? It "coaches" you over a 9 week period from being a non-runner to being able to run a 5k. Dan and I started this plan with the new year. We did about 2 weeks solid before life set in. You wouldn't believe how hectic our evenings get from the time Dan walks in the door: cooking dinner, sitting down to eat, baths, bedtime routine--all while keeping mobile twins happy and out of trouble! It's a real zoo. A lot of times our way to deal is Dan takes the babies running while I cook. That way the babies are happy and out of the kitchen! But this doesn't work out too well since I don't get that running time, and Dan wants me to be able to come along too.

At the start of the year, we signed ourselves up for the Mardi Gras Mambo, a 10k event in Baton Rouge. This was to help motivate us to keep up with the C25K, but we never did finish the training. The 10k was this past Saturday, and we basically winged it! Ha! It was quite interesting. Dan set us a really easy goal of finishing the 6.2 miles in only 1.5 hours. That goal shouldn't be difficult even with us skipping training, except Dan had to push twins in a jogging stroller the whole way! (Along with a stash of toys, jackets, bottles, etc loaded in the bottom of the stroller.) But he did great! I was actually the one holding us up. I was getting lots of pain in my hips, which I thought was from not stretching or something. But I visited one of the physical therapists that were available on site after the run, and it turns out it's related to my iliotibial band syndrome (basically, my bowleggedness from a tight IT band in my leg which causes my hip to crack when I walk/run. If you know me, you know what I'm talking about because I've probably made you feel the cracking before haha. Or you've seen me turn my feet nearly completely backwards; that's also related to this). Anyways, not important, except I'm the one that made us come in at 1:29 (hey! it's a minute under Dan's goal!) But fortunately the therapist told me some good exercises and stretches to help my IT band and the muscles in the area so it won't be as problematic next time. My sister Mary also came; she finished around 1:12 I believe! Yay! The twins had a great time; they usually enjoy the outdoors and stroller rides, so this was a great combo for them. It was also during their nap time, as you can tell from some of the pics below!

Babies bundled up before the race
About to start! Look so legit with that number on my tummy ;)
And we're off!
Dan during the race
Babies during the race
Post-race snack

It was a great day. We met Toni and her "math friends" for lunch at Izzo's aftwards. Then that night we met my mom for sushi at Tsunami and saw Cirque du Soliel - Quidam! We can't wait to sign up for more races this year, and of course do the Mardi Gras Mambo again next year!

love,
beth

Sunday, February 26, 2012

Milestones and more!

Asher and Eli are getting SO big. I've said this since they were born, but they're really starting to prove it! They recently had their 9 month check up. Eli was 17 lb 4 oz, while Asher was16 lb 2 oz. (Up from 5.2 and 4.10 when they were born).They're both 27 inches long. Eli has been babbling really well for almost a month now, whereas Asher has gotten really good at it within the last 2 weeks. Asher can now say "Dada!" And if you think that's cute, you should see how proud Dan gets with Asher says it; now that's cute! Asher can also wave (that's been going on a week or so), and as of tonight he can give high-fives! Both boys can pull to standing, climb low furniture, crawl ("real" crawling rather than their usual scooting), and go from lying to sitting on their own. Eli has gotten excellent as "cruising" furniture too. Since they're over 3/4 of a year old now, we're already looking forward to their first birthday party! Wow! Here's some recent pics:

Asher waving
Eli cruising
Both babies pulling up to standing ;) The story behind this photo is their bath was cut short because Asher pooped. Another first!
They also both have their bottom two front teeth! They've been in since early January I believe. (Excuse Eli's snotty nose here; they also both had their first sickness recently! It wasn't too bad; they didn't even run fevers).
Silly "family portrait"!

I also have a video of Eli babbling and Asher waving, but they'll have to come at a later time because I'm having trouble posting them tonight. :(
love,

beth

Friday, February 24, 2012

Lent


It's lenten season once again, and I think it's one of the most misunderstood times of year in the "Christian calendar" if you will. I'm no lent expert, but some things have always bothered me about this time of year, and I just want to talk about them a little (you know, now that I blog what I want ;)

1. Lenten menus at restaurants
-The Catholic practice of giving up meat for Lent causes restaurants to go crazy with new menu items only offered this time of year and/or specials that make ordering seafood menu items a great deal for your wallet. As a pescetarian (vegetarian that eats seafood), I actually get excited about lent for this reason. So I feel that often times, more is being gained in "giving up meat" (new dishes to try and a smaller check) rather than using the sacrifice to remember what Christ did for us at the end of those 40 days. It hardly makes giving up meat noticeable, must less an opportunity to submit to Christ and remember that He is all we need.

2. Giving up chocolate, etc just to make Lent a 40 day weight loss plan
-Making lent about self-improvement is just that: making lent about ourselves. It's something we do out of our sin and selfishness, which is so ironic to me when I just think lent should be a special time of focus on Christ's sacrifice, and in fact the least focus upon ourselves. It's funny how we're always able to turn even the act of "giving up something for lent" about gaining something for ourselves, when really it's always been about Him.

3. ...
-I keep trying to come up with a #3 just so I didn't make a numbered list with only 2 items, but it feels forced so I'll stop and close here. I'm not meaning to point blame with my post; I wanted to share these because I personally have struggled with items 1 & 2 every year that lent comes around since at least 3rd grade, and maybe others are trying to figure it out too. I don't have it figured out by any means, but if I poke some holes and get some hearts in on what I'm trying to say here, maybe lent
will be a little more meaningful this year.

Oh man, I just thought of something I could have written for #3 haha: the openly complaining about what you're giving up. Just think about that one a little on your own.

Anyway, I'll leave you with this sweet song that fills my heart each time I hear it. First because it holds so many truths, second because it was played in our wedding during prayer time and those first few notes bring memories flooding back, and third because it reminds me of the lenten season.


<I cannot for the life of me figure out how to embed the song I want to play here, so for now I'll just add the lyrics. The song is "How Deep the Father's Love for Us" by Philips, Craig, and Dean. Get it on iTunes or here's a link on YouTube if you want to hear it!>

"How deep the Father's love for us,
How vast beyond all measure
That He should give His only Son
To make a wretch His treasure

How great the pain of searing loss,
The Father turns His face away
As wounds which mar the chosen One,
Bring many sons to glory

Behold the Man upon a cross,
My sin upon His shoulders
Ashamed I hear my mocking voice,
Call out among the scoffers

It was my sin that left Him there
Until it was accomplished
His dying breath has brought me life
I know that it is finished

I will not boast in anything
No gifts, no power, no wisdom
But I will boast in Jesus Christ
His death and resurrection

Why should I gain from His reward?
I cannot give an answer
But this I know with all my heart
His wounds have paid my ransom"


(during the prayer I mentioned above)
-beth

Thursday, February 23, 2012

Sweet Wall Decor Craft + Tutorial

Introducing my first "real" crafty post! Hooray! I'll show the final product first to get ya excited. Ready?

(click on photo to enlarge and see all of them full-size)

How cute is this laundry sign with just the right touch of color and funk? I can't claim the laundry sign itself, but the touch of DIY craft that made it my own was, well, all my own! And the good news? It's so easy to make your own! I'm here to tell ya how.

1.  Pick up this plain "laundry" sign at World Market for $15 on sale ($19.99 original price), or any piece with a similar row of straight hooks that needs some pizzaz will work! Get creative!


2. Grab your supplies. In addition to your hooks, you'll need your stash of fabric scraps (This is GREAT for those teeny weeny scraps that are too cute to throw away but you can't do anything with them...til now!), a pencil, scissors, hot glue and gun, mod podge and brush, and the correct number of *flat* buttons.


 3. Using your pencil, trace around your button onto your fabric, slightly wider than the button itself. Cut out the tiny circle of fabric.


4. Brush a layer of mod podge around the edge of your button, then brush the top. Place your fabric circle on top, then press the fabric down around the edges of the button to wrap the button. Don't worry if your fabric doesn't completely cover the sides of the button; you won't be able to tell in the final product with it hanging on a wall. (Ps. the pic below is just to show you the mod podge on the button; that huge piece of fabric isn't what you wrap your button in! It's just a small circle of fabric that you are adhereing to the button.)


5. Pretty soon, you'll have several of these beauties and be feeling quite proud!


6. Hot glue the final fabric covered buttons to the ends of your hooks.


7. Hang that baby up on a wall and admire!

Until next time,

beth

ps. Like this idea but don't feel like making your own buttons for the project you have in mind? email me at bhiggi5@tigers.lsu.edu and I'd love to sell you some buttons made by moi through my etsy shop!
http://www.sewallisonwonderland.etsy.com/

annoucement, announcement, ANNOUNCEMENT!


I have an exciting announcement to make :) No, baby # 3 is not on the way and won't be for a loooong time; it's not *that* big or exciting of an announcement ;) But I have chosen to extend the realm of this family-oriented blog to include my crafts as well!

This was, believe it or not, a hard decision for me. I didn't want to down-play the importance of chronicling the twins' lives, and I still won't let that happen. I began a "side-blog" to keep up with my crafts, but I found it to be 1) hard to be serious about two blogs and 2) artificial in the sense that I was separating out parts of my life and putting them in two separate places. So, from this point forward, I have decided:


(If you're a Tigers fan, you get it; if not, don't worry about it, it's cheesy anyway ;) The point is: I'm pushing myself a little further with my blog, to blog what I want! Family, crafts, and maybe a little beyond. I hope you enjoy it!

The first "new" post for my "new" blog will be coming shortly, once I transfer it over from my separate craft blog that I've chosen to abandon. Ha!

Lots of love,

beth